HydroBucket DWC Review
Growing DWC HydoBuckets
We put the HydroBucket to the test. Controlled environment hydroponic greenhouse growing is intensive. While capable of producing amazing growth and yields, it can be a tough environment on grow gear. The UV and intensity of sunlight, especially through summer months, will show us quickly what stands the test of time–whether for use indoor gardening, outdoors or in a protected greenhouse environment. Additionally, there is a lot of heating and cooling cycles–things can go from really hot to relatively cool.
[quote]the access port is a huge time saver and made sure our plants remained happy, without interruption. There is much to be said about not having to juggle plant lids with delicate root systems to perform these daily checks![/quote]
Firstly, What is a HydroBucket?
The HydroBucket by Visionary Hydroponics is a DWC (deep water culture) based design that can be used to grow a single plant, several smaller plants and can be linked together for a multi unit hydroponics system. The concept is very well suited to the DIY grower who wants to grow on a budget and would like to take a hands on approach to constructing their own hydroponic system that works well.
Deep Water Culture has been around for a long time, it’s not new and is well proven to be able to grow a wide variety of crop types in an equally wide variety of situations. The longevity of the popularity of the system is likely rooted in it’s effectiveness, ease of use and affordability. There aren’t many (or any) “moving parts” to the system–making it affordable, easy to source while remaining very friendly in terms of ease of use and construction. On smaller scales, you can be up and growing in hydroponics in less than an hour for under a hundred dollars.
Additionally, very little time is required with DWC system–it’s self automated to a degree and is a big time saver for a busy lifestyle. Of further benefit is that it saves big on water and nutrients, ie a sealed growing system; little moisture is lost to the air.
DWC System Components:
Opaque, chemically resistant and sturdy container to hold nutrient solution (5 gallon plastic buckets, totes, etc)
A sturdy lid to fit snugly over the container to support the plant cup or pot
A net pot or cup (holds plant(s) and is supported by lid; the roots grow freely down into the covered container filled with nutrient solution
An aquarium airstone, airline and a suitable air pump (for aeartion, to provide oxygen to roots)
A handful of grow rocks or aquarium stones
(to help anchor plants in net baskets)
–That’s it, in a nutshell!
What’s Special About a HydroBucket?
The Visionary Hydroponics people set out to make a good thing like DWC growing even better with the HydroBucket. Based on our results cropping through controlled environment greenhouse conditions we’d say they hit the mark square on.
The Problem with DWC:
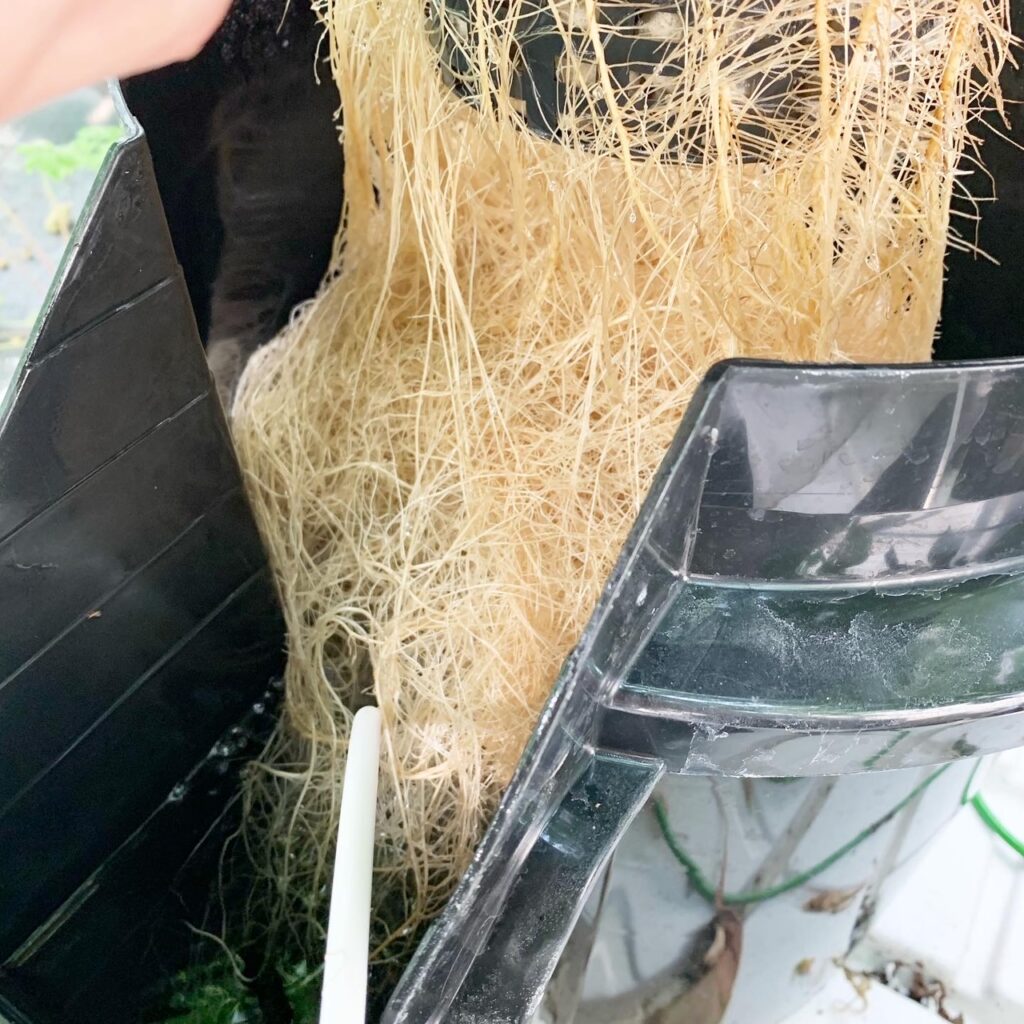
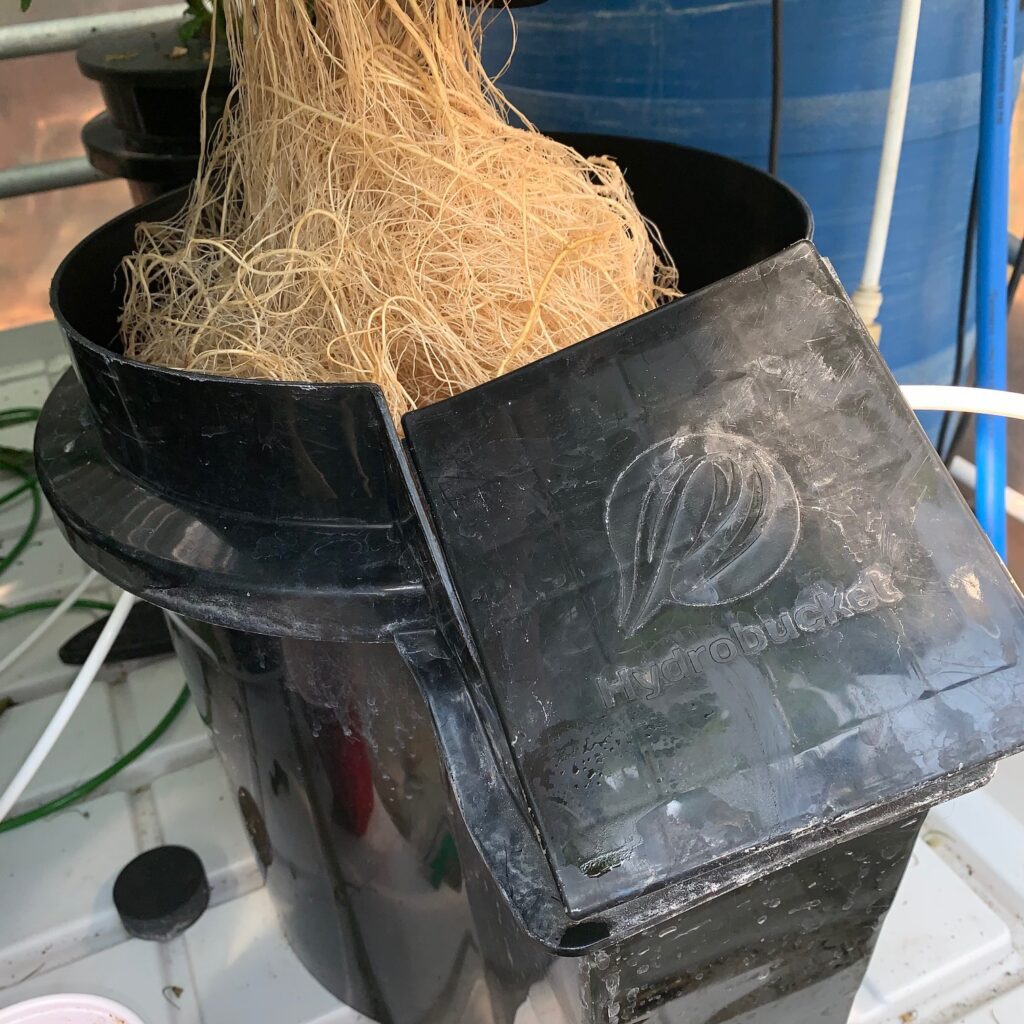
If you’ve ever grown in DWC buckets before you know what a hassle and mess it can be to do nutrient solution change outs weekly or even daily checks of pH (measure of acidity to alkalinity) and TDS (total dissolved solids, fertilizer concentration in nutrient solution). That’s because you have to lift the lid off the bucket or container that is supporting a very large, heavy plant with a big Santa Beard like root system to get at the nutrient solution. If you’ve grown DWC before you know exactly what we mean. If you haven’t, you will. While not enough of an issue to turn people off DWC, it is at best is a hassle and can make a mess. If dealing with really big plants it can hurt cropping potential, as large healthy root systems can get damaged from constant handling and exposure to bright and dry grow environments.
The HydroBucketSolution:
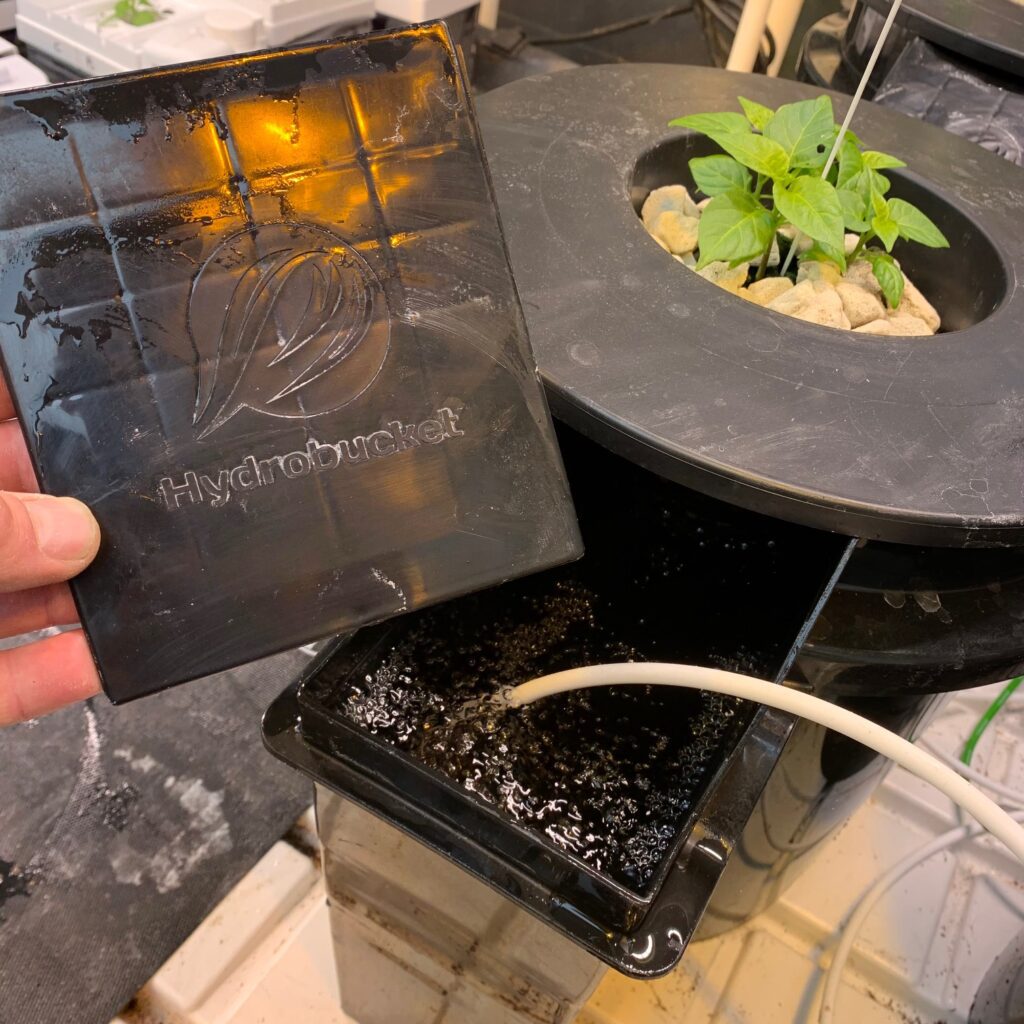
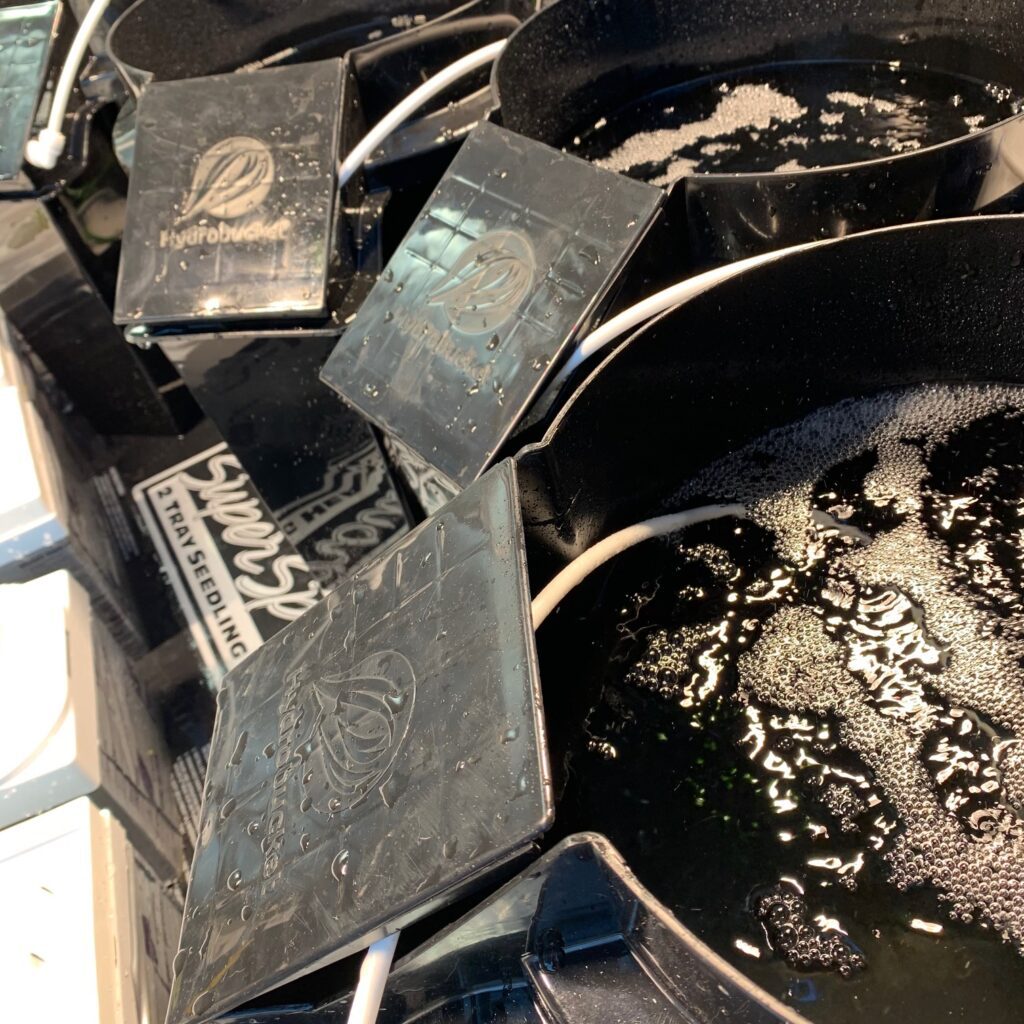
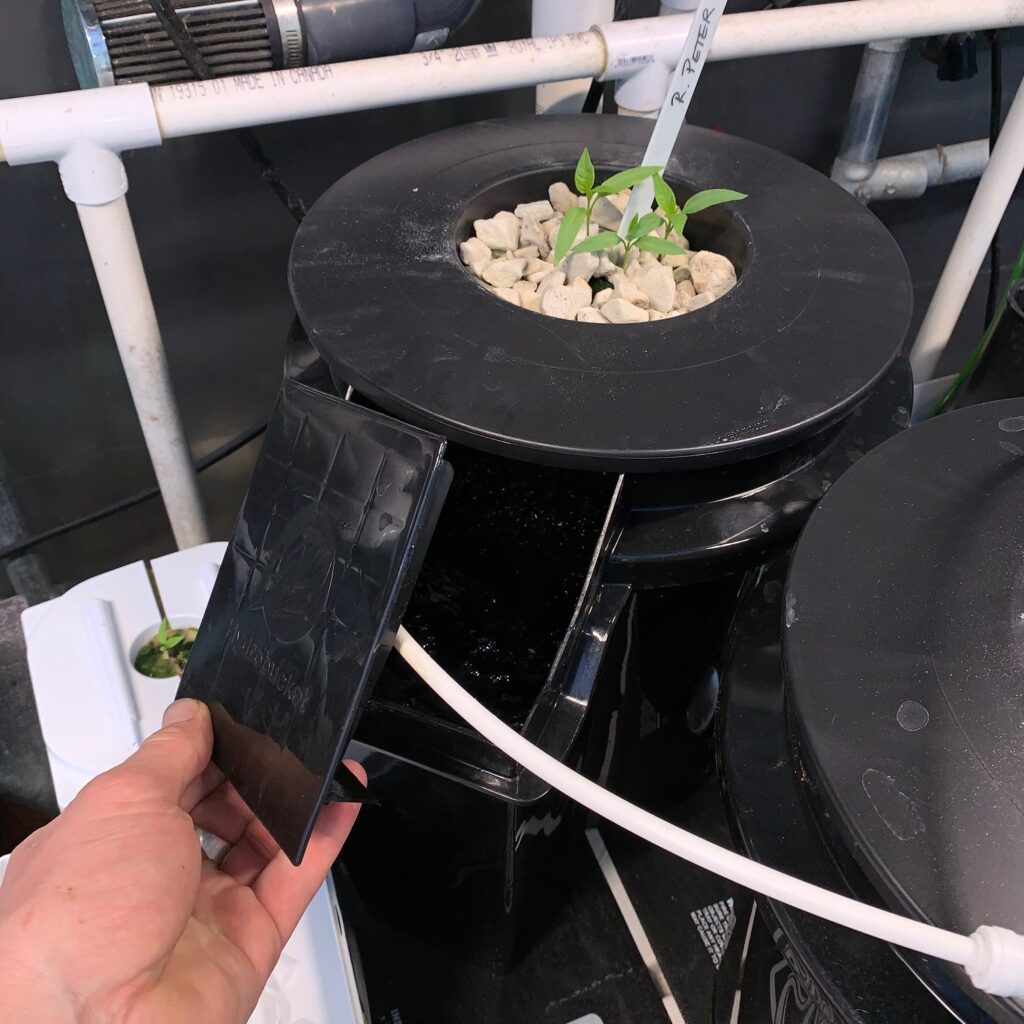
Truly one of those “why didn’t I think of that” ideas, and a great one at that. All about simplicity. Give growers easy access to the nutrient solution or rhizosphere (root zone) in DWC containers and eliminate the need to disturb the plant. And yes, they did. An access port with removable cover is built right into each bucket. They still retain all of what’s good about a bucket system too, ie stackable, sturdy, opaque, affordable and easily adaptable to plumbing fittings. Best of all, the top of the bucket diameter is still the same size as standard five gallon poly buckets–so you can use your existing lids or off the shelf lids, whether from the hydroponic shop or the hardware store. Additionally, there are graduated lines inside the container that are easy to see by removing the lid of the access port. No more guessing at how much nutrient solution to add or top. The access port is even large enough to drop a small submersible pump with tubing to the bottom of the bucket to make emptying the bucket during nutrient change outs tidy and hassle free.
HydroBucket Review
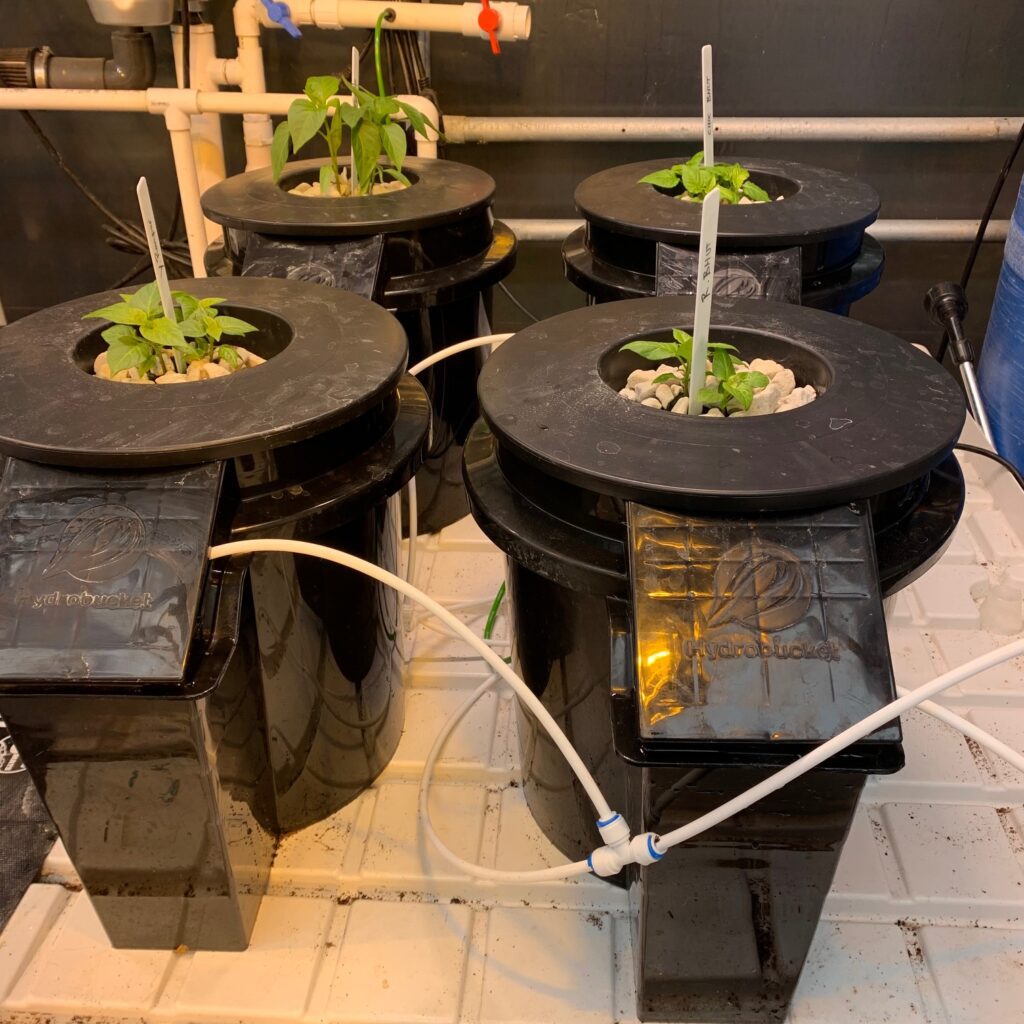
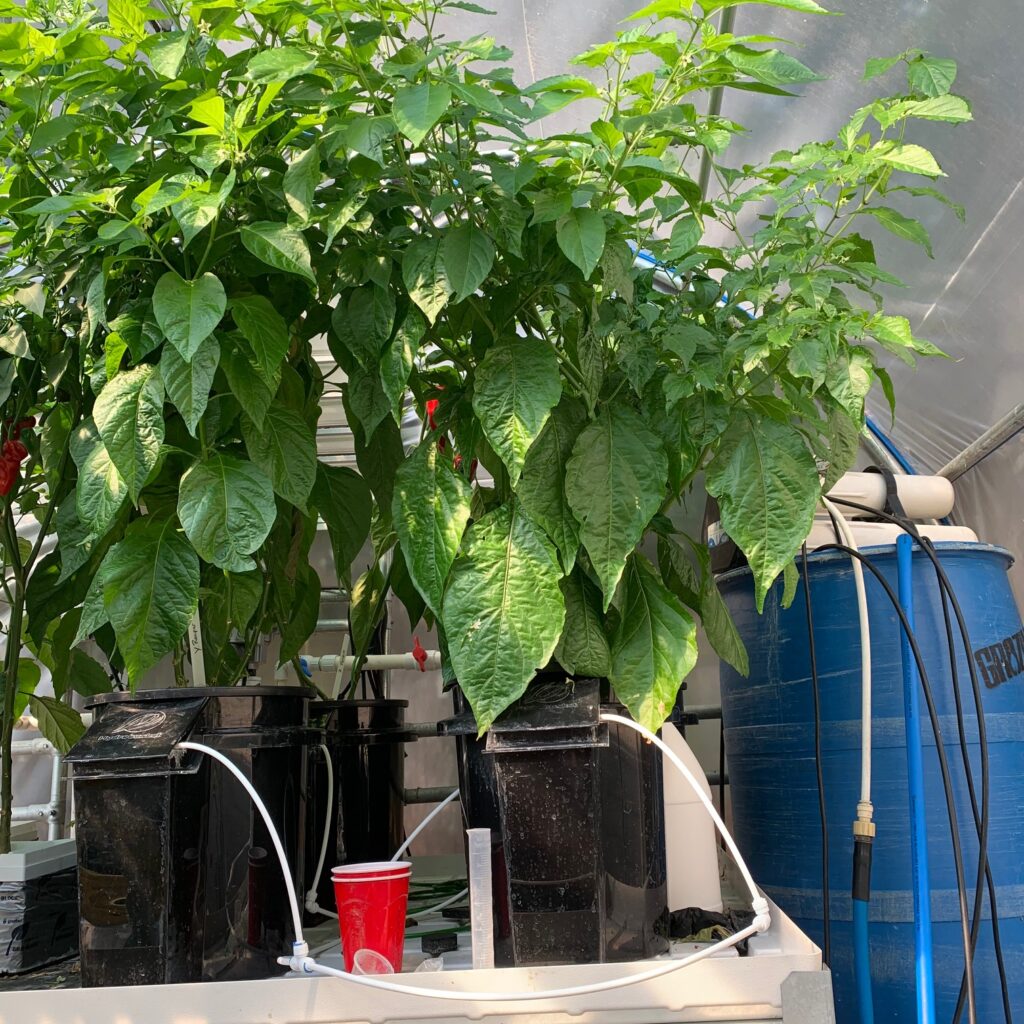
We put four HydroBuckets on top of our rolling greenhouse bench early Spring in the Canadian Pacific NorthWest. The greenhouse bench has bottom heat and receives supplemental lighting as necessary, or to provide longer days or increase intensity on cloudy days.
We run a regenerative blower for hydroponic system aeration in the greenhouse, so we added an additional manifold with four 1/4″ airlines going to each of the buckets. To each airline end inside the buckets we used a two inch round salt water aquarium airstone (more durable than fresh water types for hydroponics). Our local hydroponics store had lids with a net pot for plants built right in that fits standard bucket sizes. We’ll keep our eyes out for something a little more innovative, however (hint, hint). Probably the easiest and lowest cost grow build out we have performed to date.
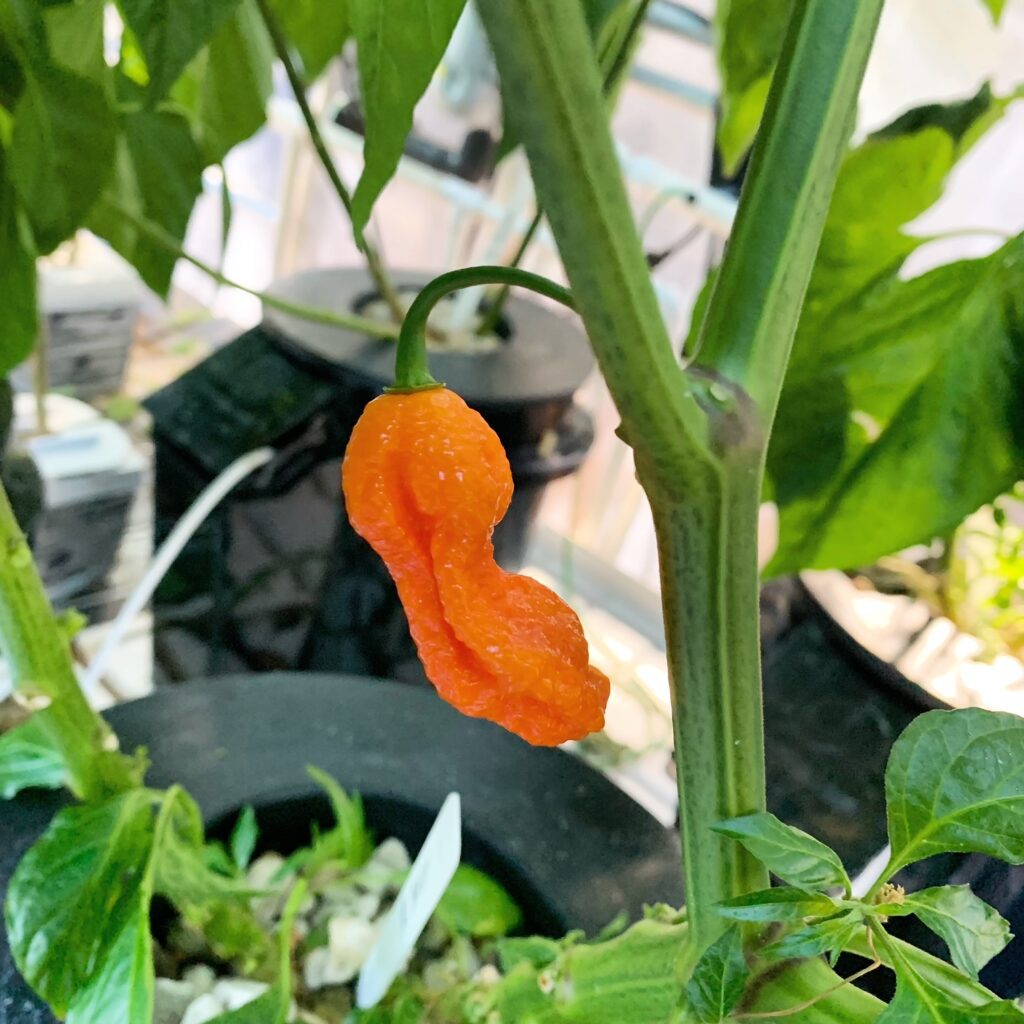
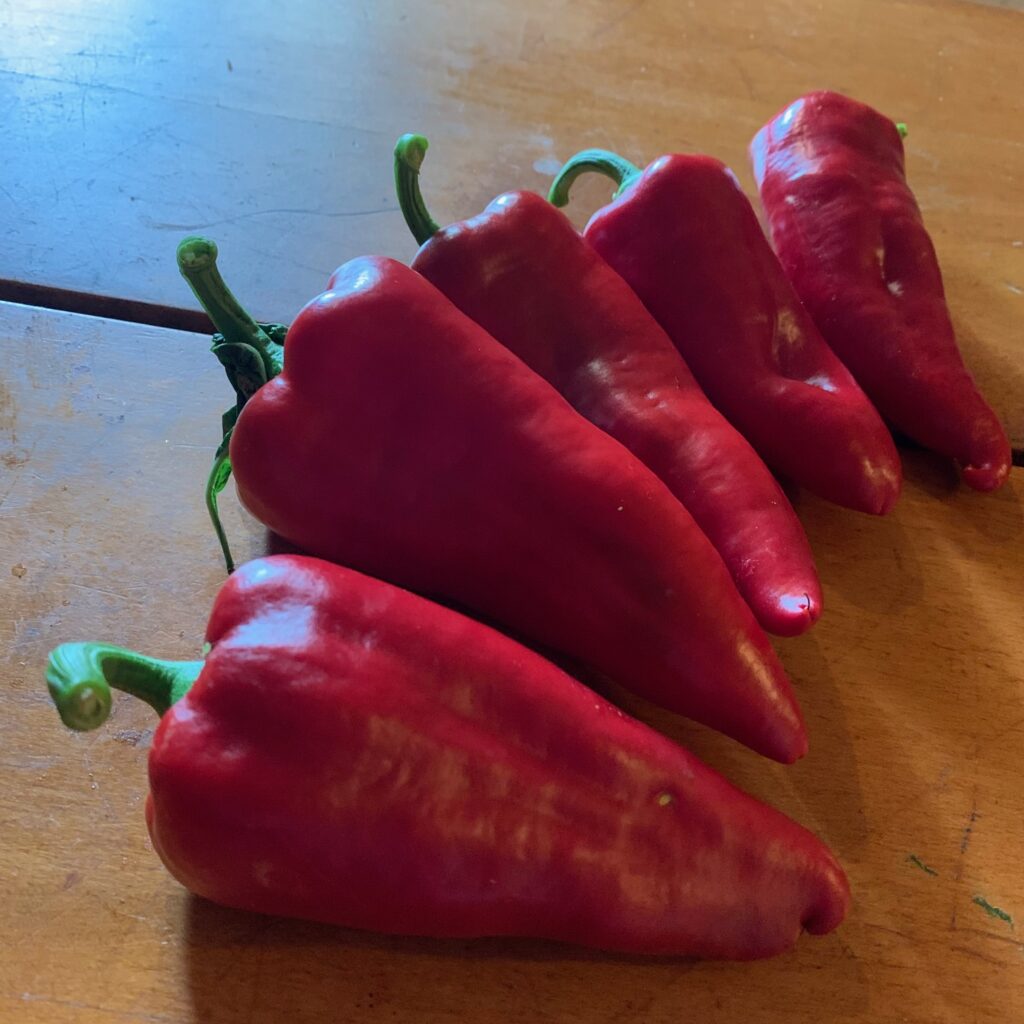
We were growing a variety of Chilies (capsicum, hot peppers) this season and had some healthy one or two inch tall seedlings available to plant. We placed the smaller starter cubes into the net basket portion of the lid and filled with a couple handfuls of grow rocks.
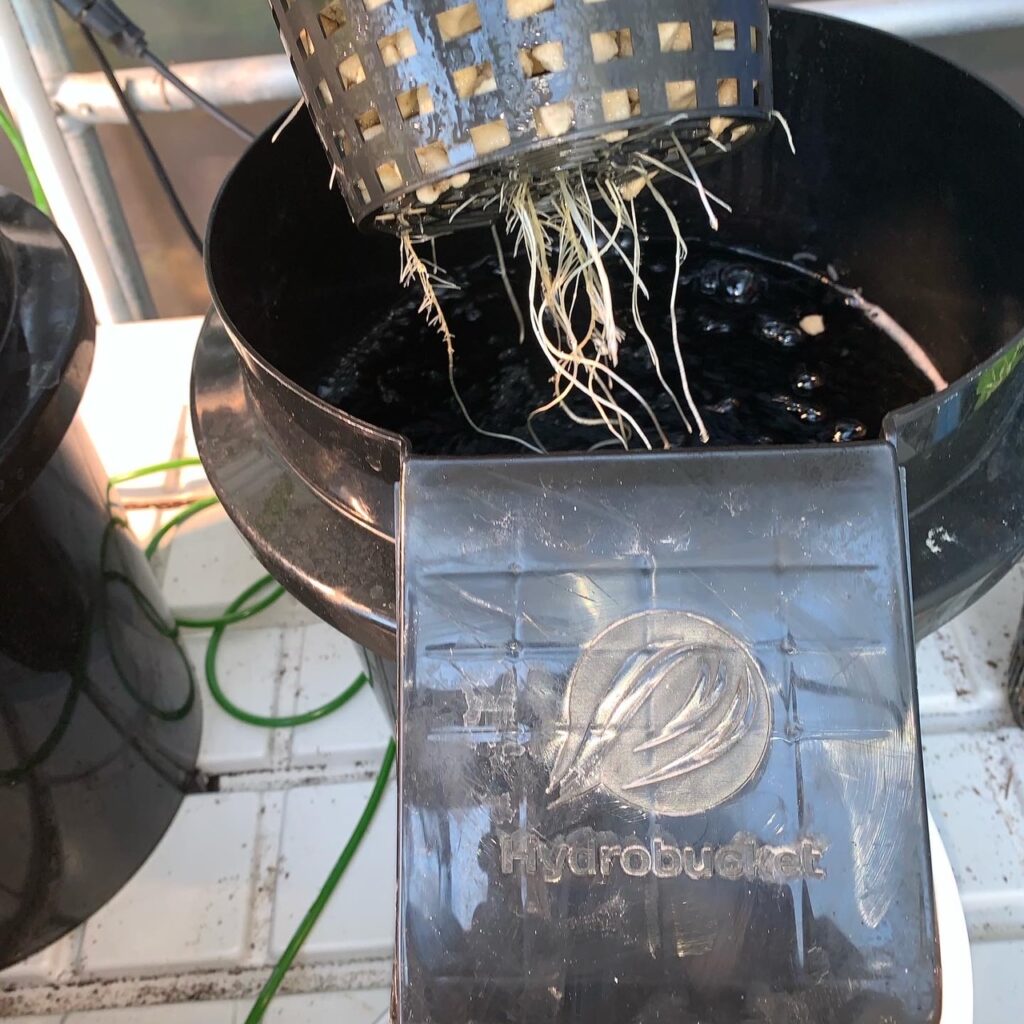
We then filled the HydroBuckets with a nutrient solution intended for hydroponics (Cultured Solutions) at a mild concentration until it was level and just barely touching the bottom of the net basket supporting the tiny little pepper plants. Each of the HydroBuckets received plenty of aeration; akin to a jacuzzi for roots.
Once a day or every other day we checked the pH (adjusted as necessary) and topped up with fresh nutrient solution as it became depleted. This took only a few minutes to do; the access port is a huge time saver and made sure our plants remained happy, without interruption. There is much to be said about not having to juggle plant lids with delicate root systems to perform these daily checks!
Initially, we only needed to add a small amount of nutrient solution weekly as the hot pepper sprouts started off very small and very little moisture is lost to evaporation with a snug fitting bucket lid. Within a week or two we let the solution level lower on it’s own to keep some space between the bottom of the net basket and the depth of the aerated nutrient solution.
It wasn’t long before we started to add more nutrient solution daily–top up frequency is a good diagnostic in assessing plant health with DWC system because we know the majority of what we add gets used by the plant and not lost to the drier surrounding air. Using Cultured Solutions nutrients in RO filtered water we found the pH to be exceptionally stable. Almost no adjustment required.
DWC Grow TIP: For a stable and healthy DWC nutrient solution use RO Filtered water. Since we have bigger demands in our greenhouse we run an EvolutionRO 1000 US GPD system. For just a few DWC HydroBuckets buckets, the big water jugs from the grocery store or gas station are great and usually don’t cost much. Tap water can have all kinds of issues, although in some geographic locations it might be well suited for hydroponics (rare, count yourself lucky if you do!). To stretch your dollar you can also use the store bought pure water to “cut” your less desirable tap water; not ideal, but helpful.
Fast Forward…The DWC HydroBucket Results
Healthy roots that yielded healthy fruits. This was the warmest summer we have on record in this part of the world. The sun was INTENSE. The plants flourished (in part because checking and adding nutrient solution was so quick and easy) and the HydroBuckets did not fade, crack or get brittle. We can all but guarantee a common plastic tote would NOT have lasted this particular summer before cracking or even worse buckling and giving out in the extreme heat.
Well, you don’t even have to take our word for the results–just check the pictures we took through the growing season.

We give the HydroBucket a solid 5/5 out for performance, ease of use and value. Ideal for the budding DIY hydroponic grower.
You can bet we’ll keep on growing with our HydroBuckets–and feel that they aren’t just for DWC applications. Stay tuned, as we hope to take our HydroBuckets to the next level with aeroponic misting nozzles inside for a true aeroponics system since access to the nozzles will be easy for regular inspection and cleaning with the access ports.
Additional Deep Water Culture Grow Tips:
Keep your nutrient solution free of organic matter; very few organic ingredients will play nice in DWC over periods of time. By using salt-based nutrients only your roots can withstand warmer environments with ease and your pH and EC will remain stable with regular top-ups.
Use plenty of aeration and good quality airstones. There’s a very direct link between aeration levels and growth rates–don’t skimp out on the air pump or regenerative blower.
Hypchlorous Acid (HOCl-) is a safe form of chlorine used in the food processing and handling industry. It is very safe and effective at killing micro organisms like plant pathogens. Additionally it helps keep nutrient residues from forming–adding it to your nutrient solution as recommended by a hydroponic additive label can help keep roots healthy and pathogens away even under tougher growing conditions.
If you run lots of aeration you can run your nutrient fertilizers at lower concentrations for outstanding results. While it may sound counter intuitive, plants with lots of oxygen at the roots in high quality nutrient formulations take up nutrients more readily and efficiently versus traditional growing methods.
Use the highest quality water available to you. Tap water that is low in Total Dissolved Solids can run through a dechlorination and sediment filter for better results. Reverse Osmosis filtered water is recommended for the best cropping results possible.