Vertical Hydroponics, Part Two
How To Build, Materials List
In Part ONE of Vertical Hydroponics, we discussed the potential benefits of setting up a vertical hydroponics system for gardening versus conventional, using a proven commercial NFT (nutrient film technique) growing systems for greens and herbs as the basis for our DIY design. By growing vertical in the exact same space as before, we increased our number of finisher plants from 72 to 180 while adding considerable space for raising transplants to fill the Finisher Channels on demand for consistent perpetual harvesting.
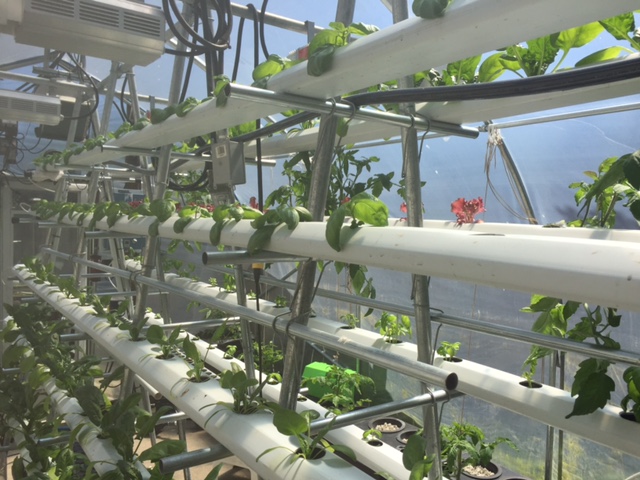
We talked about being able to use as much of the stock AmHydro NFT system as possible while sourcing easy to find locally durable materials like galvanized steel fence post and galvanized steel electrical conduit to construct a rugged commercial grade vertical support system.
An important criteria that we decided on, and have met successfully, is that the system can be assembled with a minimum of tools or fabrication time while remaining adjustable for ground slope or desired system pitch (to return nutrients via drain end of NFT channel runs). No hole drilling was a big one, and we kept it to an absolute minimum by using innovative Greenhouse Wire Straps to connect all of our different sized steel tubing together.
Sourcing Steel Tubing for Vertical NFT Support
From your local building centre and or chain link fencing and electrical supplier, you shouldn’t have a hard time finding the common galvanized steel tubing below (fence post and conduit).
Fence Post
Note in North America common lengths for 1-3/8” diameter Fence Post is 21 feet and 24 feet.
The 21 foot lengths are for continuous runs (“swag end”-they have built in couplers). We opted to work with the 24 foot lengths and had ZERO waste—the local fence supplier cut to length for us too, free of charge.
There are different gauges (tubing wall thickness) available—you don’t need anything heavy duty here; stick with the lighter gauges (a higher number).
Cut Lengths:
1 Piece-12 foot long by 1-3/8” diameter galvanized steel tubing (fence post)
10 Pieces-8 foot long by 1-3/8” diameter galvanized steel tubing (fence post)
Steel Conduit
Note, in North America the common length for 3/4” diameter Electrical Conduit galvanized steel tubing is 10 feet. Couplers are available to make continuous runs—you’ll need two per vertical stand, btw.
Out of the 10’ lengths we bought at our local home building store, we found the following cut lengths make best use of 10 foot long material while giving lots of flexibility to the system, i.e. the distances we choose to stack the NFT channels apart (so you a have a few extra inches to work with, if needed).
Cut Lengths:
5 Pieces-41 inches long by 3/4” diameter galvanized steel tubing (electrical conduit)
5 Pieces-38 inches long by 3/4” diameter galvanized steel tubing (electrical conduit)
5 Pieces-33 inches long by 3/4” diameter galvanized steel tubing (electrical conduit)
5 Pieces-29 inches long by 3/4” diameter galvanized steel tubing (electrical conduit)
5 Pieces-24 inches long by 3/4” diameter galvanized steel tubing (electrical conduit)
2 Pieces-10 feet long by 3/4” diameter galvanized steel tubing (electrical conduit)*
2 Pieces-2 feet long by 3/4” diameter galvanized steel tubing (electrical conduit)*
*this material for the two runs, one on each side, of continuous steel tubing that connect the Upright Framing supports together in the vertical hydroponics “A Frame” system. Not intended to be confused with the separate 24” lengths for the NFT channel supports.
Greenhouse Wire Straps
If you plan on following our advice, and saving the need for drilling holes while giving your vertical hydroponics support system unlimited flexibility in terms of where you want to place any single joint at any time, you will need to buy some inexpensive but harder to find wire straps.
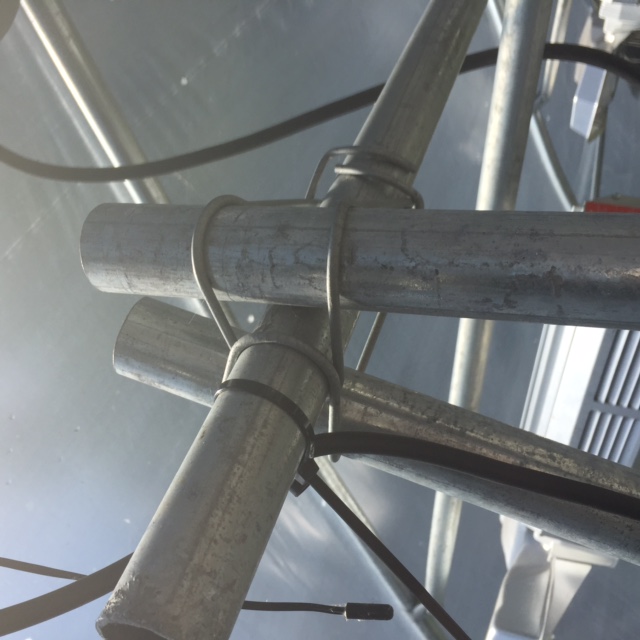

These innovative straps allow you to make connections between the different lengths and diameters of steel tubing with no screws, bolts, welds, etc required. They will easily support the vertical NFT hydroponics system—in fact they are used in greenhouse structures to help connect roof arches with purlins (horizontal greenhouse frame joints).
Here’s a place you can order them ONLINE.
Greenhouse Wire Strap Count:
10 Pieces-1-3/8” diameter to 1-3/8” diameter right angle galvanized wire straps (for the 12’ foot length of 1-3/8” diameter tubing that runs on top down the length of the A-Frame).
50 Pieces-1-3/8” diameter to 3/4” diameter (for connecting the 3/4” diameter NFT channel supports to the 1-3/8” diameter steel fence post tubing as uprights in A-Frame)
10 Pieces-1-3/8” diameter to 3/4” diameter (for connecting the 3/4” diameter runs of continuous tubing, one on each side, connecting the uprights together in the vertical hydroponics NFT support system)
Additional Vital Building Materials for Vertical Hydroponics Support System:
10 Pieces-plastic automotive funnels that can be connected to drain hose**
10 Pieces-3/4” TEK fasteners + hex drill driver bit (self drilling, self tapping screws)
gloves (recommended when working with wire straps)
tape measure
permanent marker
50 Pieces-rubber “crutch ends” for 3/4” diameter tubing (optional, for safety)
50 foot length rain hose, ie 3/4 diameter for connecting to plastic funnels
35 Gallon hydroponic reservoir (UC Pro Module and Lid)
Mag Drive 6 Pump
24 feet 3/4” poly irrigation hose, and a few “T”s, “L”s and hose clamps
Plastic Zap Strap Ties
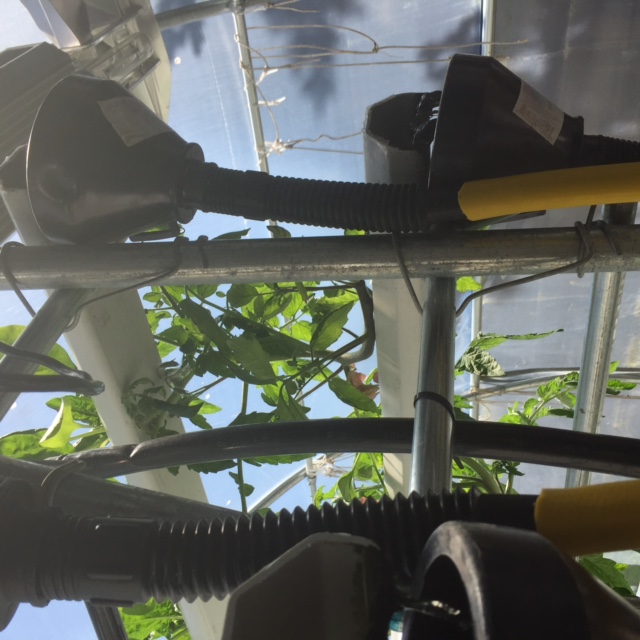
**We found our Funnels at a local Dollar Store (discount store); these are a very important part of the system; look for something 4 inches across or bigger that you can easily attach to the 3/4” diameter round steel tubing. We used a single TEK screw to attach each funnel securely in place. Our funnels couple perfectly to 3/4” diameter drain hose to drain nutrient solution from the channels, captured into the end funnel and back to the hydroponic reservoir where it is recirculated to the irrigation manifolds supplying each of the NFT channels.
Note, the hydroponic system itself is available from AmHydro as parts or as complete systems. We used the following items:
10 Pieces-12 foot long Finisher Channels (7.5” centres)
2 Pieces-irrigation manifold
10 Pieces-1/4” irrigation “goof plugs”
“Lip Bender” tool (you can suffice with sheet metal bending vice grips)
How to Assemble the Vertical Hydroponics Support System
Make sure the area you are assembling in is the final area for set up and is clean of debris and obstacles, you’ll need a little elbow room to set up—and a step ladder! This can be done by one person, although most people will benefit from having an extra set of hands available to help.
*Wear gloves when handling cut steel lengths and greenhouse wire straps*
If you have to cut the steel yourself (the conduit is easy, fence post is best by others) use an abrasion type cutting wheel on a circular saw—wear goggles, gloves and be super careful—clamping material down with vice grips helps make round tubing easier to cut safely.
If working in a poly covered greenhouse, don’t poke sharp steel ends through the material when handling the tubing!
Assembly
Each upright requires,
2 Pieces-8 foot long 1-3/8” diameter fence post
1 Piece-41 inch long conduit
1 Piece-38 inch long conduit
1 Piece-33 inch long conduit
1 Piece-29 inch long conduit
1 Piece-24 inch long conduit
10 Pieces-1-3/8” diameter to 3/4” diameter tubing greenhouse wire straps
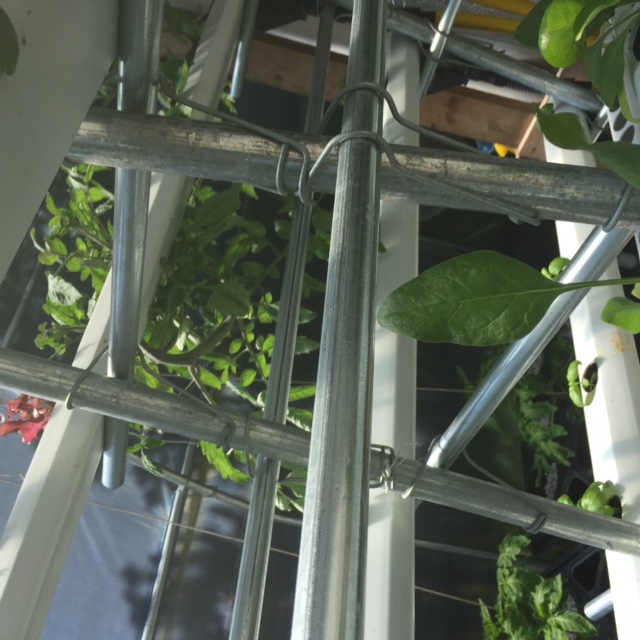
Have a look at the photos in this article as to the general assembly of the support system—make a couple practice connections using the wire straps. After a couple of tries they become really easy to work with.
After you have assembled FIVE “A”s (two uprights, five cross members), you’ll be ready to connect them together at the top of each support with the 12 foot length of 1-3/8” diameter tubing and TWO 1-3/8” diameter to 1-3/8” diameter greenhouse support wire straps for EACH of the five upright assemblies—that’s where the extra set of hands helps lots.
Finally, connect each of the side continuous runs of 3/4” diameter conduit tubing to each of the upright A-Frame supports with the additional TEN greenhouse support wire straps.
DON’T worry about having the support system exactly square as you build, just be as close as you can by eyeball. Each framing member can be gently tapped exactly square with a hammer and tape measure once it’s all assembled together before placing the NFT hydroponic channels onto the support. The beauty of the wire straps: infinite adjustability!
DO try and build a drop of around 3 inches from the delivery end to the catchment end for good nutrient solution flow and drainage (3 inch drop in a 12 foot run).
For Added Safety:
You may choose to cover the ends of the NFT system supports that stick out into the aisle with the rubber crutch tips—a little bit of silicone caulking will help keep them in place. Otherwise, file smooth and watch where you walk—or paint the ends with bright coloured paint.
Reservoir, Pump and Irrigation Tubing
After the metal tubing has been assembled and is in the final position, you can go ahead and attach the funnels (with TEK fasteners) to the drain end along with the drain hoses, place the 35 Gallon reservoir underneath and secure all of the drain hoses running into it with plastic zap strap ties to the metal support framing.
Place the pump into the reservoir, cut 3/4” diameter poly pipe to run up from the reservoir to the top of the system. With an “L” fitting, cut another length of 3/4” poly irrigation pipe to run the length of the system to the end with the irrigation manifolds—connected with a “T” fitting. Hose clamps are recommended at all hose connections; stainless steel is best.
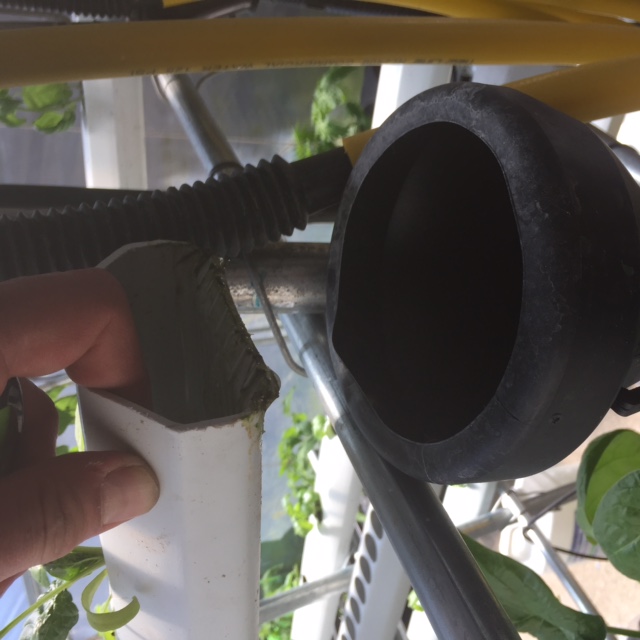
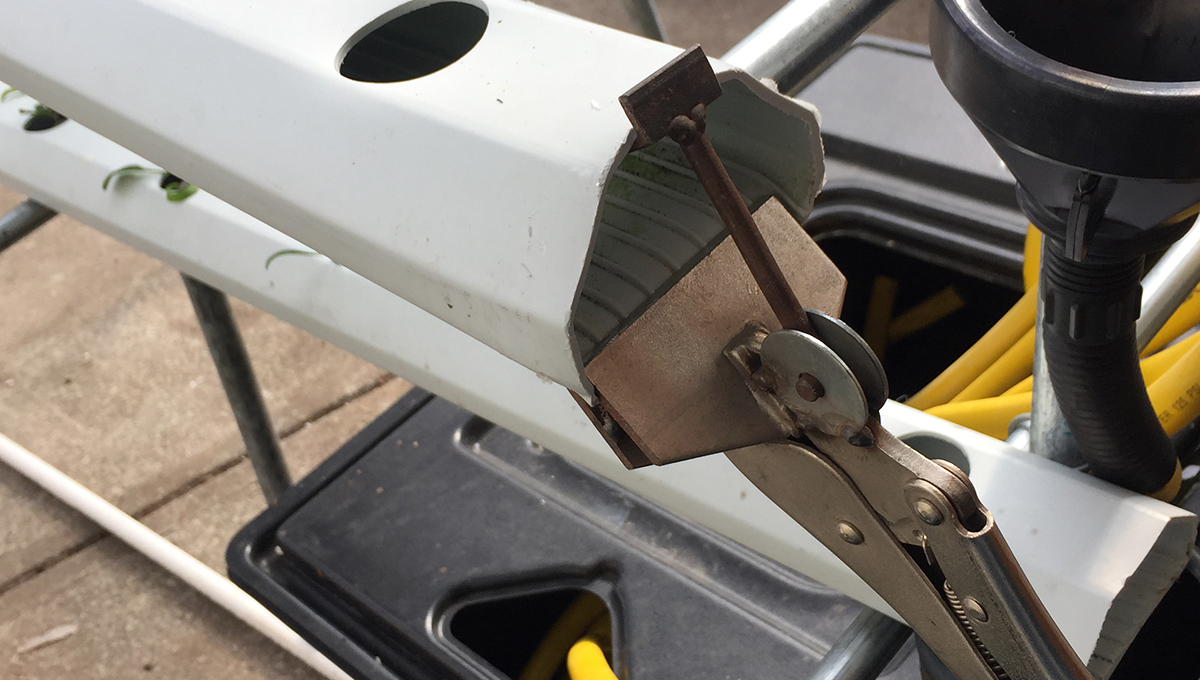
Lip Bending *IMPORTANT*
While it may sound odd, bending down or removing the slightly upright lip at the drain end of your AmHydro GroClean NFT channels is important for the funnel catchment drain system to work without losing a single drip of nutrient solution. We heated the drain end of the NFT channel gently with a torch and used the modified Vice Grip Sheet Metal Benders supplied by AmHydro to bend the lips downward. Contact AmHydro for more details on their well proven line of NFT Pro Clean channels and complete systems.
Important-LEAK TEST-
A single drip is no big deal, however, that single drip repeating itself 24/7 every second is going to create a mess and waste nutrient solution. Any issue is compounded with multiple drip points.
Run the system for a day or two before planting to watch for any leaks if they should surface.The drain end can take some practice, but rest assured, once mastered can be operated 100% drip free 24/7. Also pay close attention to where your irrigation tubing from the pump connects to the manifolds supplying the nutrient solution to the channel.
Coming NEXT:
Vertical Hydroponics, Part THREE: Vertical Garden Management + MORE.